Computer is connected to the internet with a router or a firewall or a modem:
1. Open url http://192.168.1.1 in browser.
2. Login using your airtel modem's username and password. Default login and password are admin and password.
3. Click on link Advanced Setup --> WAN in the left side menu.
4. You'll have options to add or remove configurations.
5. On the right screen, you see a single service listed called PPPoE. Click on Edit.
6. Set the VPI=0 and VCI=35 (for Airtel it would be 1,32) and click next.
7. Select connection type: Bridging and encapsulation type: LLC/Snap Bridging and click next.
8. Check Enable Bridge Service Option & Enter the Service Name.
9. Click Next and Save.
10. Now you will be back to the first screen with the service listed as bridge. Click on Save/Reboot. This will reboot your modem. Wait for 2 mins for complete reboot to happen.
11. This completes the configuration for the modem.
12. Finally configure your system as above said (Computer is connected directly to the internet without any router or firewall).
Showing posts with label Static IP. Show all posts
Showing posts with label Static IP. Show all posts
Thursday, November 13, 2008


Assign Static IP to the System
1. Start --> Control Panel --> Network Connections; find the network connection that represents your connection to the internet. Most often it's labeled simply Local Area Connection.
2. Right click on that and select properties.
3. Now click on the Internet Protocol (TCP/IP) item in the list.
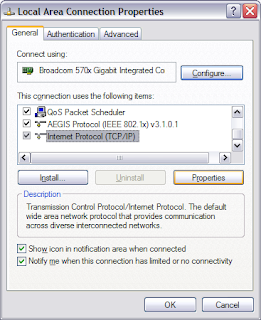 4. Now click on the properties button.
5. A default configuration will have both Obtain an IP address automatically, and Obtain DNS server address automatically selected.
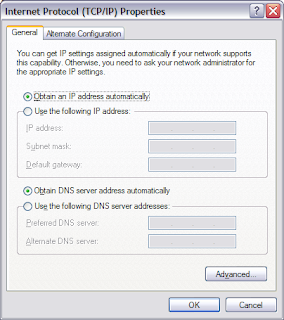 6. Click on Use the following IP address: and enter the IP address, subnet mask, and default gateway information that your ISP should have given you. (If they did not give you all three, ask them.)
7. In most cases they will also give you IP addresses for the DNS servers you should use. Click on Use the following DNS server addresses, and enter that information as well.
8. That's it. Once you "OK" your way out of those configuration dialogs, your computer should now respond to its assigned IP address.
2. Right click on that and select properties.
3. Now click on the Internet Protocol (TCP/IP) item in the list.
 4. Now click on the properties button.
5. A default configuration will have both Obtain an IP address automatically, and Obtain DNS server address automatically selected.
 6. Click on Use the following IP address: and enter the IP address, subnet mask, and default gateway information that your ISP should have given you. (If they did not give you all three, ask them.)
7. In most cases they will also give you IP addresses for the DNS servers you should use. Click on Use the following DNS server addresses, and enter that information as well.
8. That's it. Once you "OK" your way out of those configuration dialogs, your computer should now respond to its assigned IP address.
Subscribe to:
Posts (Atom)